Friday, October 29, 2010

Hard As Wraps - Update/Review

Last Sunday I blogged about a new Sally  Hansen's Hard as Nails, Hard as Wraps nail polish I purchased which is normally quite pricey but I got at it half price. (Click here to go to that post)

We it's been 5 days since I painted my nails with it and now it's time to tell you the results.  First here are the pictures of my finger nails 5 days after painting it...


Let's see of their 2 claims about their product are true:

1.  FLAWLESS COLOR THAT LASTS (4/5 stars)
As you can see [kind of] see the nail polish has worn off on all finger nails.  They claimed that the color would last longer but for me it lasted about the same time as the cheaper versions of Sally Hansen's I have purchased.  But my with my job and lifestyle (washing poopoo, kids hands, rubbing on hand sanitizer many times a day, shampooing my hair everyday, etc, etc..) Even the toughest, most expensive nail polish won't stay on perfectly for more than 5 days (actually it's started wearing off on the 3rd and 4th day already).

I give a 4/5 because it did last through my working days reasonably well and it's definitely better than those 3 for 15 baht nail polish hehe...I shouldn't compare I know...=D

2.  NAILS THAT WON'T BREAK OR PEEL (5/5 stars)
It also claims that I will get hard nails that won't crack or peel.  Well, guess what!  It actually seems like it's working.  Normally by now my nail polish is off because I've peeled the top layer of the finger nail off (they're terrible like that my nails!).  But even as I try to force to peel my finger nail right now it won't budge!

Anyways, I gota prepare for church tonight.  I'll put on a new layer of nail polish (after removing the old one of course), freshen myself up and head off.  Have a nice weekend!

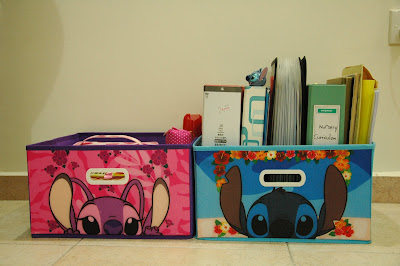
Stitch Space Organiser

I bought a space organiser to put my cosmetics in.  I bought it at Popular which is like the book store/stationary store that is most common and well known in Singapore (something like B2S in Thailand or Kinokuniya without the stationary).

It is 14" in lenght times 12" in width.  The height is 7.5".  The price was SGD 7.90.

The packaging
Un packaged
"Assembling"  This is like the " hard floor" of the organiser.
tadaaa...can you see my 2 brush cases? =D
From left to right:
My 2 makeup bags, blush and eyeshadow pallettes
My brush guards and 2 brush cases.
Partnerss!  Makeup and work storage..ha!
 Of course I don't just leave them on the floor like that.
This is just for the purpose of picture taking!
 It is cute and helps me store and move my makeup around the house all at one go =) HAHA why would I move it around the house?  Well, sometimes I put on my make up in the bedroom and other times I put it on in the living room.

See, I'm a very simple person all the makeup/cosmetics I own in the world can fit into one small space.  Of course that doesn't include my nail polish, nail polish remover, hair products, other body parts products...LoL....

Little by little I shall collect =P

Wednesday, October 27, 2010

Pencil Cases Turned Brush Cases

I have quite a collection of eye and face brushes and I wanted to have a cute and safe place for them.  I haven't found any good or affordable brush rolls or cases but I found some really cute pencil cases that I used instead...


It can fit my 6 face/cheek brushes =)


It can fit 11 (and lots more if I had more..hehe)
of my eye and lip brushes.
 It's made from thick cardboard and closes magnetically.
Hmmm.. I'll have to do a future blog on my brushes.  But that's it for now!

I wish I could use it more often but I'll have to wake up earlier to beautify myself...hopefully next school year my work load won't be as tiring.

I've been planning to make my own brush roll (no sewing).  I got the idea from this youtube video.  Maybe during my holidays I could work on it.

Oh by the way I got both pencil cases at AMK Hub.  On the 2nd floor.  The pencil box at a stationary store (I forgot the name of the shop but it sells tons of notebooks) and the pink pencil case at a shop that sells like precious moments stuff...I"m not sure if the name of the shop is Precious Moments of something else.

Tuesday, October 26, 2010

Sister Style

I miss my sister.

I miss going shopping with her and getting her opinion and advice.  She knows best!  Especially for me!

But I'm so happy for Skype!

...So it was fun doing window shopping with her online and asking her what color was nice and what color suits me. =)

I can't wait to see her and go shopping and eating with her!

Monday, October 25, 2010

If...

You know what?...If I weren't working I swear this blog would be about me cooking and baking...I miss those days! =D  But this is also good!

Do it Myself Brush Guards

I got this idea from a video in youtube...


Click here to watch the video


I don't know what those mats are called exactly so I will call them anti-slip mats. =)

I saw them selling 5 for a dollar at Fair Price (the Tops Supermaket of Singapore) and said why not?!


I tried to sew the first few but I suck at sowing so I decided to just tape it and it still works the same. As you can see in the picture below the one on the left is sewn and the one on the right is taped with regular scotch tape.


You just wrap the mat around your brush (any size brush) and cut it if you need to. Before sewing it or taping it test if the brush can slip through just right (not slip through easily or get stuck).
1.  Here's my face brush
2.  Here I'm sliding it in
3.  And it fits just right!
Basically this is to help keep [makeup] brushes in shape especially after washing them. The professional or "real" brush guards look like this:

Watch it here in Michelle Phan's youtube tutorial.


(Can someone help me I forgot how to put youtube videos straight onto my blog instead of having to link them) Thanks!


Sunday, October 24, 2010

$$ Disclaimer $$

Don't convert the prices to THB!

I've [kind of] stopped doing it because it's makes me crazy!

Just a little ratio... SGD$1 is equal to around THB23

BUT...The value of $1 here is like 10 Baht in Thailand...if you know what I mean.

Nail Polish Marathon

I've been putting on nail polish on, different colors in a row for a pretty long time now.  Even before makeup I would collect nail polish.  I had a whole bunch which I gave away before I started work.  But then I found out I could wear nail polish to work so I've started collecting again!

I just want to share on 2 Sally Hansen nail polish's I own.

The first is this bluish kinda glitter one. It's Sally Hansen's Hard as Nail Xtreme Wear in (19) Marine Scene.  I have this for some time and almost used up half of it already.

Here is the bottle:

I'm so glad I work in a place where I can paint my toe nails, oh and wear jeans too!  Compared to working in Thailand we dress really casually here =)

I also shared the Marine Scene nail polish with some of my youth girls.  There was a Sabbath we all brought our nail polish...hmmm...I must sound like some radical pastor's wife! HAHA

And Here's my 2nd Sally Hansen's nail polish:


It's Hard as Nails, Hard As Wraps in Mauve Cream.  It doesn't have any glitter but it gives a nice shine/gloss finish.  This one has a so-called formula that seals and hardens nails.  At the back of the box it says:

You Have - Fragile, soft, torn, chipped or cracked nails in need of protection.
                     Nail color that doesn't last through the week.
You Want - Hard nails that won't break or peel.
                     Flawless color that lasts.


I just got it last night so I'll see if it works.  So far it just seems like a normal nail polish.  I have really chipped nails, and tried different stuff to no avail so I'm still kinda in doubt about this one.  I got it because I like the color and it was on sale!

Both nail polish was on sale when I got it. =D  Actually all nail polish I've gotten so far I'd get them when their on sale.

The usual price for the bluish one was SGD$11 but I got it for $6 or $7.  The pink one was originally $14 dollars and it was on sale for $7.  I got both at Watson's.  I'm not sure if Guardian has it.

Over here the main drug stores are Guardian and Watson's.  While in Thailand it's Watson's and Boots.  So that's the comparison for you. =P

*Quick Review:

Marine Scene (bluish):  Dries quick, long-lasting.

Mauve Cream (pinkish):  Doesn't dry as quick as some other
polishes I have.  Will update on the long-lastingness and nail hardening =D

Saturday, October 23, 2010

Simple One Lah

Hi!  Thanks for dropping by! =)

I'm really happy to be excited and inspired about something again.
As I mentioned in my other blog Reign of Glitter this blog is going to be more on makeup and stuff.

*DISCLAIMER*
 I'm no professional or wanna be.  I'm just plain old simple me being excited about something and wanting to share that excitement!

My sister and girlfriends are so far away or so hard to meet up with that this is just a good way to share (I mean do you think Bayu will be interested to hear me babble on about this kind of stuff?!)

So future blogs will include some items I have purchased, what I use, how I use it, cool ideas or videos or sites I've discovered, etc. etc.

It's just gonna be really simple simple stuff because I'm not richie rich HAHA

I wish I could start now but it's ,midnight and I gotta sleep!  The reality or work is waiting for me tomorrow =)

Do It Myself Eye Primer

Urban Decay's and Too Faced eye primer is quiet (Was debating in my mind wether to use expensive or pricey and without thinking typed in exspicy)..so yeah expensive/precey =P

So I heard from Charmaine that I could make my own eye primer so I watched several videos on youtube of other youtubers making their own eye primer.  There wasn't one tutorial I followed exactly.  I kind've just got ideas from several videos and made my own combination.

I was happy I had all the ingredients I needed just lying around at home!  I took some pictures on my cellphone (my camera was with Bayu!):

Filled 1/2 the container with body butter, 1/4 with my concealer, and 1/4 with my foundation. And mixed it up with a toothpick until all the lumps are gone.

Here is my finished eye primer among my eyeshadows =)

Purple shadow: on the right no primer
Purple shadow on the left: with primer!
Red shadow on the right: no primer
Red shadow on the left: with primer!

Yay!


Fixing a broken heart (aka eyeshadow)

I just got a new eyeshadow palette.  So new that of eight colours I only used.  Then in one lousy moment where I was half asleep carry my unzipped makeup bag it dropped out and....
I broke  2 pans of eyeshadow ='( boo hoooo  one was slighty cracked at the top and bottom and the other one (the matte brown one) was broken into a million pieces...

But I had a solution!  Thanks to my hours and hours of watching youtube makeup gurus doing all kinds of tutorials (yep, instead of doing work).

Once again I didn't get this idea from just one guru but I watched several and used different ideas from different gurus.

So here is what my eyeshadow palette looked like cracked & broken:


And here is what it looked like after I "fixed it":


If you're interested to know how I did it...please read on! =)

I put it on top of white facial tissue so it could catch any fly aways.

The key ingredient to get it back together is isopropyl alcohol. (I used 70% from Guardian at almost SGD$4)

I also used a toothpick and a mini mini spatula

So I worked on the most damaged eye shadow first by using a toothpick to crush it into fine powder.  I moved it into a small cup because it was easier to work with (word of advise though, don't use a cup use a container with a flat surface NOT a curved surface).

I dropped several drops of the alcohol and mixed it up with the toothpick until it was paste-like.  Then I put it back into the eyeshadow pan and flattened it out with the mini mini spatula.  Finally, I covered my finger with the facial tissue and pressed (don't be afraid to press HARD) on the eyeshadow until it was reasonably flat.
I left it to dry and work on the other broken eyeshadow...

(As you could see previously)The other eyeshadow was not as badly broken as the brown one and I didn't want to powderize the WHOLE pan...so I gently cracked the broken area only then dropped in the alcohol.  Smoothed it out with the mini mini spatula and then lay tissue ontop and flattened it with my finger. (This way is better than wrapping it around my finger)

Sweep away the leftover powder and TADA!  It's "almost" as good as new! (Should leave it to let the alcohol evaporate for about an hour to over night)